
What are some brake tips for the Audi A3? Here’s a quick example: you’re cruising down the highway and suddenly, you brake. If you believe that your vehicle’s stopping power is reliable, you might want to think about the brake pads in your vehicle.
Here is a step-by-step procedure for changing the brake pads on your Audi A3 in this guide. We’ve got everything you need to know, from the state of their equipment to which pads they’ll need. Replacing squeaky, worn-out brakes with smooth, safer brake stops is an upgrade from old brakes to new brakes. Let’s take a look at Audi A3 brake pad replacement.
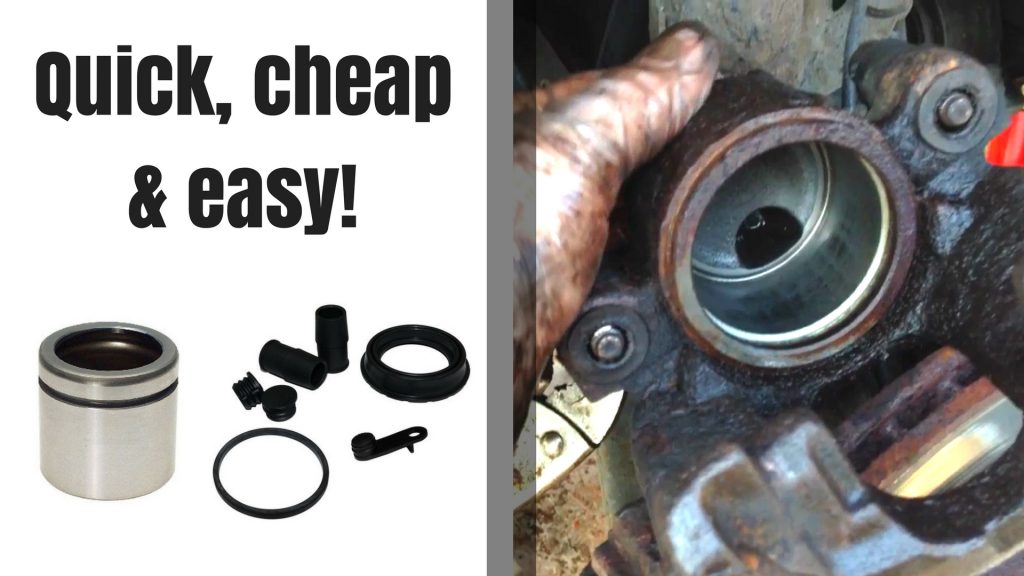
Here are the essential tools and materials you’ll need to do this DIY brake pad replacement for your Audi A3. We’ll start by going over the basic tools and materials you’ll need. Whether you’re a seasoned mechanic or a recent graduate, this step-by-step guide will assist you in tackling the task with confidence. You’ve gathered your resources, and we’d like to get started.
Preparing for the Job
In the realm of DIY car maintenance, the adage “an ounce of prevention is worth a pound of cure” couldn’t hold truer than when it comes to replacing your Audi A3 brake pads. Before delving into the intricate process of swapping out those crucial components, it’s imperative to kickstart this automotive endeavor on the right foot. This brings us to the second step in our meticulous guide: Preparing for the Job.
Gathering Necessary Tools and Materials:
To embark on this automotive journey, arm yourself with an arsenal of essential tools and materials that will set the stage for a successful brake pad replacement. In your toolkit, you’ll want to ensure the presence of items such as a lug wrench, jack stands, a C-clamp or brake caliper tool, a socket set, a torque wrench, a bungee cord or wire hanger, and a brake fluid bleeder kit. Each of these tools plays a pivotal role in streamlining the brake pad replacement process. And remember, quality tools aren’t just a convenience; they’re an investment in both your car’s well-being and your peace of mind.
Ensuring Safety Measures:
Safety should always be paramount when tinkering with your vehicle’s vital components. Before diving into the brake pad replacement, take heed of the following safety measures:
-
Parking on a Level Surface: Your first act of diligence involves selecting a flat, level surface for your automotive operation. This ensures that your Audi A3 remains stable and secure during the process. An incline could introduce unnecessary risks, making it difficult to properly engage your tools and maintain control over the vehicle.
-
Using Wheel Chocks: Imagine your car rolling unexpectedly while you’re knee-deep in brake pad replacement. To prevent this potentially dangerous scenario, utilize wheel chocks. These simple, wedge-shaped devices wedge firmly against the tires not being removed, effectively immobilizing your vehicle. This extra layer of security ensures your Audi A3 won’t budge, regardless of the task at hand.
As you gather your tools and set up your workspace, remember that meticulous preparation sets the stage for a smooth brake pad replacement. With the right equipment at your disposal and safety precautions firmly in place, you’re poised to navigate this automotive endeavor with confidence. So, let’s dive into the intricacies of assessing your brake pad condition and guiding you toward a safer, more responsive Audi A3 braking experience.
Assessing Brake Pad Condition
In the realm of automotive maintenance, few aspects are as pivotal to your safety as the condition of your brake pads. As we delve into the meticulous process of Audi A3 brake pad replacement, the critical juncture of “Assessing Brake Pad Condition” emerges as a paramount step. Knowing when to replace your brake pads is akin to deciphering the language of your vehicle, and in this section, we will demystify the process.
Explain how to determine if your Audi A3’s brake pads need replacement:
-
Visual Inspection: Begin your assessment by visually inspecting the brake pads through the wheel spokes. In most cases, you’ll want to look at both the inner and outer pads. Adequate lighting can be your ally here, as it helps reveal the condition of the brake pads. Here’s what to look for:
-
Pad Thickness: Measure the thickness of the brake pad material. New pads typically have around 12 millimeters (mm) of thickness. If the pads have worn down to 3 mm or less, it’s usually time for a replacement.
-
Wear Indicator: Many brake pads come equipped with a wear indicator – a small metal tab that becomes exposed as the pad wears down. If you spot this indicator or notice it’s close to the surface, it’s a clear sign that replacement is imminent.
-
-
Auditory Clues: Your ears can also provide valuable insights into your brake pad’s condition. As you apply the brakes, listen for any unusual sounds. Squeaking, squealing, or grinding noises often indicate worn-out brake pads. These audible cues should never be ignored, as they are clear indicators of potential problems.
-
Braking Performance: Pay close attention to how your Audi A3 responds when you apply the brakes. If you notice a decreased braking performance, such as longer stopping distances or a spongy brake pedal feel, it’s a strong indication that the brake pads are past their prime.
-
Vibrations and Feedback: When you press the brake pedal, if you feel vibrations or pulsations, it could be a sign of uneven brake pad wear or a warped rotor. While this may not exclusively point to the brake pads, it warrants further inspection.
-
Warning Lights: Modern vehicles often come equipped with dashboard warning lights specifically designed to alert you to brake issues. If your Audi A3’s brake warning light illuminates, it’s a clear indication that you should have your brake system examined promptly.
Incorporating these methods into your routine vehicle maintenance can help you stay ahead of brake pad wear and ensure your Audi A3’s braking system remains in peak condition. Remember that timely brake pad replacement not only ensures your safety but also prevents further damage to other crucial components of the braking system, such as the rotors. So, embrace these assessment techniques as your key to a safer and more reliable driving experience.
Gathering the Right Parts
In the intricate dance of maintaining your Audi A3’s braking system, the steps you take along the way can mean the difference between a smooth, responsive stop and a potential hazard on the road. As we delve into the vital phase of “Gathering the Right Parts,” two fundamental aspects come to the forefront: the quality of your brake pads and the art of selecting the perfect ones for your Audi A3. Let’s navigate this terrain with precision and insight.
Discuss the importance of using high-quality brake pads:
The brake pads in your Audi A3 are not merely passive components; they are the linchpin of your vehicle’s safety system. As your car hurtles down the road, the ability to decelerate effectively is, quite literally, a matter of life and death. This is where the significance of high-quality brake pads becomes undeniable. Here’s why:
-
Optimal Stopping Power: High-quality brake pads are engineered to deliver consistent and superior stopping power. They grip the brake rotors with precision, ensuring swift and controlled deceleration even in emergency situations. This is especially vital when you need to stop abruptly to avoid a collision.
-
Reduced Brake Fade: Brake fade occurs when the braking system overheats, leading to a decline in performance. Top-notch brake pads are designed to dissipate heat effectively, minimizing the risk of brake fade and ensuring your brakes remain responsive in all conditions.
-
Longevity: Investing in high-quality brake pads often translates to greater longevity. They tend to wear more slowly, resulting in less frequent replacements and potential cost savings in the long run.
-
Minimal Noise and Dust: Quality brake pads are engineered to produce minimal noise and generate less brake dust. This not only enhances your driving experience but also reduces the wear and tear on other brake components.
Provide guidance on how to select the right brake pads for your Audi A3:
Selecting the perfect set of brake pads for your Audi A3 can seem like a daunting task amidst the plethora of options available in the market. However, with a systematic approach, you can make an informed decision:
-
Consider Your Driving Style: Evaluate your typical driving conditions and style. Are you a city commuter or an enthusiast who enjoys spirited driving? Different types of brake pads, such as ceramic, semi-metallic, or organic, are better suited to specific driving styles and conditions.
-
OEM vs. Aftermarket: Original Equipment Manufacturer (OEM) brake pads are designed to meet the manufacturer’s specifications. While they offer compatibility and familiarity, aftermarket options often provide a broader range of choices and can be more budget-friendly without compromising quality.
-
Read Reviews and Seek Recommendations: Utilize online resources and consult with fellow Audi A3 owners or automotive forums for reviews and recommendations. Real-world experiences can offer valuable insights into the performance and durability of specific brake pad brands.
-
Check for Certification: Look for brake pads that meet industry standards and carry certifications such as the DOT (Department of Transportation) or FMVSS (Federal Motor Vehicle Safety Standards). These certifications indicate that the brake pads have undergone rigorous testing and meet safety standards.
-
Consult with a Professional: If you’re unsure about the best brake pads for your Audi A3, don’t hesitate to consult with a trusted mechanic or automotive expert. They can provide personalized recommendations based on your vehicle’s specific needs.
In the intricate process of selecting brake pads, remember that safety should always be your top priority. While cost-effectiveness is essential, compromising on the quality of brake pads can have severe consequences. Investing in high-quality brake pads tailored to your driving habits and vehicle specifications is an investment in your safety and the safety of those sharing the road with you. With this knowledge in hand, you’re well-prepared to embark on the journey of optimizing your Audi A3’s braking performance.
Removing the Wheel
In the intricate choreography of Audi A3 brake pad replacement, one of the initial moves on the automotive stage is the meticulous process of “Removing the Wheel.” This seemingly simple step, however, plays a pivotal role in providing you access to the brake system components. Here, we’ll provide you with step-by-step instructions on how to safely and effectively remove the wheel, ensuring a smooth transition into the heart of your vehicle’s braking system.
Step-by-Step Instructions on How to Safely Remove the Wheel:
-
Prepare Your Workspace: Begin by ensuring you’re on a level surface and have taken all necessary safety precautions. Place wheel chocks behind the tires opposite the one you intend to remove. This prevents any unintended movement while working on the vehicle.
-
Loosen the Lug Nuts: With the vehicle still on the ground, use a lug wrench to slightly loosen the lug nuts on the wheel you plan to remove. This initial loosening prevents the wheel from spinning when you lift the car off the ground.
-
Lift the Vehicle: Locate the designated jacking points for your Audi A3, often indicated in the owner’s manual. Position the hydraulic jack or car lift securely under the vehicle, ensuring it makes contact with the jacking point. Carefully raise the car until the wheel you’re removing is clear of the ground.
-
Finish Removing the Lug Nuts: With the wheel off the ground, proceed to fully remove the previously loosened lug nuts. Place them in a safe location, as you’ll need them later for reinstallation.
-
Remove the Wheel: Gently grasp the wheel with both hands, ensuring a firm hold. Carefully pull the wheel towards you, disengaging it from the wheel studs. Keep in mind that some wheels may be heavier than others, so take caution to avoid strain or injury.
-
Inspect and Store the Wheel: Take a moment to inspect the removed wheel for any signs of damage or wear, such as cracks or bent rims. If all looks well, set the wheel aside in a secure location. If you notice any issues, it may be an opportune time to address them or seek professional assistance.
Removing the wheel marks the beginning of your journey into the intricacies of Audi A3 brake pad replacement. This step is not only about access but also about safety and precision. Remember to follow these steps diligently to ensure both your safety and the integrity of your vehicle. With the wheel removed, you’re now ready to delve deeper into the brake caliper and brake pad components, bringing you one step closer to an enhanced braking experience for your Audi A3.
Accessing the Brake Caliper
Navigating the intricate process of Audi A3 brake pad replacement requires not only mechanical prowess but also a keen understanding of the vehicle’s anatomy. As we dive into the critical phase of “Accessing the Brake Caliper,” we’ll unravel the steps involved in locating this essential component hidden behind the wheel. Additionally, we’ll delve into the art of identifying the caliper and its intricate components, setting the stage for a successful brake pad replacement.
Guide on Locating the Brake Caliper Behind the Wheel:
-
Position Yourself Adequately: Start by ensuring your Audi A3 is securely parked on a level surface, as outlined in the safety measures. Then, stand in front of the wheel you intend to work on, providing you with a clear line of sight to the brake caliper behind.
-
Visualize the Wheel: Gaze at the wheel hub, imagining it as the face of a clock. The brake caliper is typically situated at the 9 o’clock or 3 o’clock position, depending on whether you’re working on the driver’s side or passenger’s side.
-
Inspect the Wheel: Look through the openings between the wheel spokes. Depending on your vehicle’s design, you may need to rotate the wheel slightly to gain a better view. The caliper should become more apparent as you peer through these openings.
How to Identify the Caliper and Its Components:
-
Recognizing the Caliper: The brake caliper is a critical component in your Audi A3’s braking system. It resembles a rectangular or cylindrical-shaped housing that clamps down on the brake rotor to initiate braking. Typically, it appears in a metallic color, often silver or black, and is prominently visible once you’ve located it behind the wheel.
-
Understanding Key Components: As you inspect the caliper, you’ll notice several crucial components:
-
Brake Pads: These are the friction material pieces housed within the caliper. They come in pairs, with one pad on each side of the brake rotor. Their role is to create friction against the rotor, resulting in deceleration.
-
Caliper Housing: This is the outer shell of the caliper that houses the brake pads and piston. It’s typically made of metal and serves to protect the internal components.
-
Piston: Inside the caliper housing, you’ll find one or more pistons. These pistons are responsible for pushing the brake pads against the rotor when you apply the brakes, initiating the braking process.
-
Brake Lines: Attached to the caliper are brake lines that carry brake fluid. These lines play a pivotal role in transmitting hydraulic pressure to the caliper, enabling the operation of the brake system.
-
-
Brake Caliper Variations: It’s important to note that while the basic components of a brake caliper remain consistent, there may be variations in design based on the make and model of your Audi A3. Some vehicles may have single-piston calipers, while others may feature multi-piston calipers, each with its unique advantages.
Accessing the brake caliper is a fundamental step in the brake pad replacement process, and understanding its location and components is essential for a successful procedure. As you become familiar with the intricacies of your Audi A3’s brake system, you’ll be well-equipped to tackle the subsequent steps of removing the caliper and replacing the brake pads with precision and confidence.
Removing the Caliper
As we delve deeper into the meticulous process of Audi A3 brake pad replacement, the next choreographed move on the automotive stage is “Removing the Caliper.” This pivotal step is where you gain access to the heart of the braking system, enabling the replacement of worn brake pads with precision and care. Below, we’ll guide you through the detailed steps of removing the brake caliper properly, ensuring a smooth and safe transition in your DIY brake pad replacement journey. Additionally, we’ll provide essential tips on handling the caliper to avoid any damage during this critical process.
Detailed Steps to Remove the Brake Caliper Properly:
-
Prepare Your Workspace: Before proceeding, ensure your Audi A3 is securely parked on a level surface, as per safety measures outlined earlier. Additionally, gather all necessary tools, including a socket set, wrenches, and a bungee cord or wire hanger.
-
Locate and Inspect the Caliper: As outlined in the previous section, the brake caliper is situated behind the wheel, clamped onto the brake rotor. Examine the caliper housing to identify the caliper bolts or slide pins that secure it to the bracket.
-
Loosen Caliper Bolts: Use the appropriate tools to carefully loosen and remove the caliper bolts or slide pins. These are typically located at the rear of the caliper and may require a wrench or socket. Loosen them enough to allow the caliper to move freely.
-
Detach the Caliper: With the caliper bolts removed, carefully slide the caliper off the brake rotor. Take care not to force it, as it should come off relatively easily. It’s essential to avoid putting undue stress on the brake line connected to the caliper.
-
Support the Caliper: Once the caliper is off the rotor, use a bungee cord or wire hanger to suspend the caliper from the suspension components or wheel well. This prevents the caliper from hanging by the brake line, which can cause damage or strain to the line.
-
Inspect and Clean the Caliper: While the caliper is off, take a moment to inspect its condition. Look for any signs of damage, leaks, or excessive wear. If you notice any issues, it’s advisable to address them promptly or seek professional assistance.
Tips on Handling the Caliper to Avoid Damage:
-
Avoid Excessive Force: When removing the caliper, exercise caution and avoid using excessive force. The caliper should slide off relatively easily once the bolts are removed. Forcing it can lead to damage or misalignment.
-
Protect the Brake Line: The brake line connected to the caliper is sensitive. Be gentle when handling the caliper to prevent any kinks, twists, or tension on the line. Securing it with a bungee cord or wire hanger, as mentioned earlier, is a crucial step in avoiding damage.
-
Cleanliness Matters: Keep the caliper clean throughout the removal process. Any debris or contaminants on the caliper’s surface can potentially compromise its performance. A clean caliper ensures a smoother reinstallation and reliable braking.
With the caliper safely removed and secured, you’re now poised to proceed with the brake pad replacement. This meticulous process not only ensures the longevity of your Audi A3’s braking system but also provides a sense of accomplishment and self-sufficiency. As you continue on your journey toward enhanced braking performance, remember that precision, care, and attention to detail are your most valuable tools.
Removing the Old Brake Pads
In the intricate ballet of Audi A3 brake pad replacement, the performance reaches its crescendo with the stage titled “Removing the Old Brake Pads.” Here, we’ll choreograph a meticulous step-by-step process for gracefully taking out the old brake pads, setting the scene for their triumphant replacement. Furthermore, we’ll illuminate the importance of inspecting other critical components like the rotor, ensuring the harmony of your vehicle’s braking system.
Step-by-Step Process for Taking Out the Old Brake Pads:
-
Release the Caliper: Begin by locating the brake caliper, as detailed in previous sections. With the caliper securely suspended using a bungee cord or wire hanger, you can now focus on the brake pads. To access the pads, gently pry the caliper apart using a suitable tool, such as a pry bar or a large screwdriver. This action creates enough space to slide out the old brake pads.
-
Slide Out the Old Pads: With the caliper slightly spread open, the old brake pads should slide out with relative ease. Remove them one at a time, taking note of their orientation within the caliper. It’s essential to remember how the pads are positioned, as the new pads must be installed in the same configuration.
-
Inspect the Pads: As the old brake pads are removed, take a moment to inspect them closely. Look for signs of wear, uneven thickness, or damage. If you notice any irregularities, it’s a clear indication that replacement was necessary.
-
Check the Brake Hardware: While the pads are out, inspect the brake hardware, including the pad shims and retaining clips. Ensure these components are in good condition, as they contribute to proper pad positioning and reduce noise during braking.
Highlight the Need to Inspect Other Components Like the Rotor:
In the performance of brake pad replacement, it’s essential not to cast the spotlight solely on the pads. The brake rotor, often referred to as the brake disc, plays an equally crucial role in your Audi A3’s braking system. As the pads are removed, seize the opportunity to inspect the rotor for any signs of wear or damage:
-
Rotor Thickness: Measure the rotor’s thickness using a micrometer or a suitable measuring tool. Consult your vehicle’s specifications to ensure the rotor’s thickness falls within the recommended range. If it’s too thin or shows signs of significant wear, rotor replacement may be necessary.
-
Surface Condition: Examine the rotor’s surface for grooves, scoring, or warping. These irregularities can lead to decreased braking efficiency and increased noise. In some cases, a professional mechanic can resurface the rotor to restore its smoothness.
-
Heat Spots and Cracks: Look for any heat spots or cracks on the rotor’s surface. These can develop due to excessive heat buildup during braking and can compromise the rotor’s integrity. If such issues are detected, rotor replacement is advised.
Taking the time to inspect and, if necessary, address rotor issues during the brake pad replacement process ensures a holistic approach to brake system maintenance. It not only enhances braking performance but also contributes to the longevity of your Audi A3’s braking components.
As the old brake pads gracefully exit the stage, and the brake rotor undergoes its inspection, the performance moves seamlessly into the act of installing the new brake pads. With each movement choreographed to perfection, you’re on the path to achieving optimal braking performance for your Audi A3, ensuring both safety and satisfaction on the open road.
Installing the New Brake Pads
In the meticulous automotive symphony of Audi A3 brake pad replacement, the act of “Installing the New Brake Pads” marks a pivotal crescendo. This choreographed performance is where precision meets safety and where the future of your vehicle’s braking prowess takes center stage. We’ll now provide clear and concise instructions on how to properly insert the new brake pads, ensuring a smooth transition and reliable braking performance. Additionally, we’ll explore the critical aspects of lubrication and precautions to further enhance this delicate installation process.
Instructions on How to Properly Insert the New Brake Pads:
-
Prepare the Caliper: Begin by ensuring the brake caliper is still suspended securely to avoid undue strain on the brake line. With the caliper in a stable position, you can proceed with confidence.
-
Inspect the Caliper Bracket: Before installing the new brake pads, inspect the caliper bracket for any signs of corrosion, rust, or debris. It’s essential to have a clean and smooth surface for the brake pads to sit on. If necessary, use a wire brush to remove any contaminants.
-
Apply Lubrication: Proper lubrication is crucial for the smooth operation of the new brake pads. Apply a thin layer of high-temperature brake grease or anti-seize compound to the areas where the brake pads will make contact with the caliper bracket. This prevents squeaking and ensures even wear.
-
Insert the New Brake Pads: Carefully position the new brake pads into the caliper bracket. Pay attention to any indicators or markings on the pads that denote their orientation. The pads should slide snugly into place.
-
Secure the Caliper: Gently lower the caliper over the new brake pads, ensuring it aligns correctly with the bracket. Insert the caliper bolts or slide pins and tighten them to the manufacturer’s specified torque settings. Proper torque ensures the caliper is securely in place without over-tightening, which can lead to damage.
-
Double-Check Placement: Verify that the new brake pads are correctly seated within the caliper bracket and that they align with the rotor. Ensure there’s no binding or misalignment.
Lubrication and Precautions to Ensure a Smooth Installation:
-
Uniform Lubrication: When applying lubrication, ensure it’s evenly distributed on the caliper bracket surfaces where the brake pads make contact. An even layer of lubrication prevents noise and promotes even wear.
-
Avoid Over-Lubrication: While lubrication is crucial, avoid over-applying it. Excessive grease can accumulate on the brake rotor, leading to reduced braking efficiency. Apply a thin, uniform layer.
-
Tighten Caliper Bolts Properly: When securing the caliper, be diligent in following the manufacturer’s torque specifications. Under-tightening can lead to caliper movement, while over-tightening can damage components.
-
Inspect Brake Lines: After installing the new brake pads, inspect the brake lines to ensure they are correctly routed and not twisted or kinked. Proper brake line positioning is vital for safety and performance.
By meticulously following these steps and heeding the importance of proper lubrication and precautions, you ensure a seamless installation of your new brake pads. This precision not only contributes to the longevity of your Audi A3’s braking system but also enhances safety and reliability on the road. As the curtain falls on this act, the next performance awaits: the reinstallation of the wheel and the final touches that will complete your brake pad replacement journey.
Reattaching the Caliper

The orchestration of Audi A3 brake pad replacement nears its finale with the act titled “Reattaching the Caliper.” This is the moment when meticulous precision meets the need for secure fastening, ensuring that your vehicle’s braking system operates flawlessly. We will provide detailed steps on how to expertly secure the caliper back in its position, followed by essential torque specifications for tightening the caliper bolts, leaving no room for error in this critical task.
Detailed Steps to Secure the Caliper Back in Place:
-
Alignment and Orientation: Begin by carefully aligning the caliper with the caliper bracket and rotor. Ensure that the caliper’s guide pins or bolts align with their respective openings in the bracket. Proper alignment is crucial to avoid unnecessary stress on the brake components.
-
Caliper Positioning: Gently guide the caliper into position over the new brake pads. Take care not to disturb the pads during this process. Confirm that the caliper fits snugly over the rotor.
-
Caliper Bolts or Guide Pins: Insert the caliper bolts or guide pins and hand-tighten them to secure the caliper in place. This initial tightening ensures that the caliper remains properly positioned during final torqueing.
-
Torque Wrench: Utilize a torque wrench to achieve the manufacturer’s specified torque settings for the caliper bolts or guide pins. Torque specifications may vary depending on your Audi A3’s make and model, so refer to your vehicle’s manual for precise values. Torquing the bolts to the correct specifications is critical for safety and performance.
-
Double-Check Alignment: After achieving the specified torque, double-check the alignment of the caliper, ensuring it sits flush against the caliper bracket. Verify that the brake pads align with the rotor without any binding or misalignment.
-
Caliper Bleeding (if necessary): If your brake system requires bleeding, this is the opportune moment to perform it. Bleeding ensures the removal of air bubbles from the brake lines, maintaining optimal brake pedal feel and responsiveness.
Torque Specifications for Tightening Caliper Bolts:
The torque specifications for tightening caliper bolts or guide pins can vary depending on your Audi A3’s specific model and year. Therefore, it is paramount to consult your vehicle’s manual or seek guidance from a reputable source to obtain the accurate torque values for your vehicle. Using the wrong torque settings can lead to inadequate fastening or potential damage to the caliper and brake components.
As the curtain falls on the act of “Reattaching the Caliper,” you’ve masterfully secured this integral component of your brake system. Your attention to detail and adherence to proper torque specifications ensure not only the safety of your Audi A3 but also the longevity and reliability of your brakes. The final scenes of this brake pad replacement performance involve reattaching the wheel, tightening lug nuts to precise specifications, and conducting a thorough system check. With these acts complete, your Audi A3 will be poised for smooth and secure braking experiences on the road ahead.
Putting the Wheel Back On
In the grand automotive performance of Audi A3 brake pad replacement, the act titled “Putting the Wheel Back On” serves as the closing scene where the pieces finally come together, and the vehicle is ready to return to the road. This seemingly simple task holds significant importance as it ensures the safe and secure attachment of the wheel, setting the stage for optimal driving performance. Here, we will elucidate the steps on how to reattach the wheel securely and emphasize the proper tightening of lug nuts in a star pattern, ensuring both safety and performance.
How to Reattach the Wheel Securely:
-
Wheel Alignment: Begin by carefully aligning the wheel with the wheel hub. Ensure that the wheel’s mounting holes align with the wheel bolts on the hub. Proper alignment is essential to avoid any issues during reattachment.
-
Lifting the Wheel: If you have a helper, gently lift the wheel onto the wheel hub. If working alone, you can use a jack to elevate the wheel to the appropriate height. Take care not to damage the brake components or scratch the wheel during this process.
-
Hand Thread Lug Nuts: To secure the wheel in place, hand-thread the lug nuts onto the wheel bolts. This initial step ensures that the wheel remains in position while you tighten the lug nuts.
-
Star Pattern Tightening: Once all the lug nuts are hand-threaded, it’s crucial to follow the star pattern tightening sequence. This involves tightening the lug nuts in a specific order to ensure even pressure distribution.
Properly Tighten the Lug Nuts in a Star Pattern:
The star pattern tightening method is essential to evenly distribute the pressure on the wheel and prevent warping or damage. Follow these steps:
-
Begin by tightening the lug nut that is at the 12 o’clock position (top center).
-
Move to the lug nut directly opposite to the first one, which is at the 6 o’clock position (bottom center).
-
Proceed to the lug nut at the 3 o’clock position (right side) and then to the one at the 9 o’clock position (left side).
-
Finally, tighten the remaining lug nuts in the same alternating pattern until all are properly torqued.
Using a Torque Wrench: To ensure the lug nuts are tightened to the manufacturer’s specified torque settings, use a torque wrench. Refer to your Audi A3’s manual for the precise torque values, as they can vary based on your vehicle’s make and model. Using a torque wrench guarantees that the lug nuts are neither over-tightened nor under-tightened, promoting safety and wheel integrity.
-
Double-Check Tightness: After torquing all lug nuts, double-check their tightness by going around the wheel one more time in the star pattern. This provides an additional layer of security.
-
Lower the Vehicle: If you used a jack to elevate the vehicle, carefully lower it back to the ground, ensuring the wheel makes full contact with the surface.
By meticulously following these steps and adhering to the star pattern tightening sequence, you not only ensure the safe and secure reattachment of the wheel but also play a crucial role in preventing issues like wheel imbalance and uneven brake wear. This final act in the Audi A3 brake pad replacement process marks the completion of a comprehensive performance dedicated to the safety and optimal performance of your vehicle. With the wheel securely in place, your Audi A3 is ready to roll confidently back onto the road, where its enhanced braking system will shine.
Testing the Brakes

Testing the brakes is the vital epilogue to the meticulous process of Audi A3 brake pad replacement, ensuring that all your efforts culminate in a safe and dependable braking system. While the steps preceding this have revolved around the physical aspects of replacement, this final act centers on functionality and peace of mind. In this segment, we will delve into the critical importance of testing the brakes before driving and provide essential tips on how to ensure they are functioning correctly.
The Importance of Testing the Brakes Before Driving:
-
Safety First: Testing your brakes is not merely a recommended step; it’s a safety imperative. The brakes are the primary component that keeps your vehicle and passengers safe. Failure to ensure their functionality can lead to accidents and hazardous situations on the road.
-
Post-Replacement Verification: Brake pad replacement, while done diligently, can introduce changes to the braking system. Testing the brakes post-replacement verifies that all components are properly aligned and functioning, reducing the risk of issues like uneven brake wear or reduced braking efficiency.
-
Peace of Mind: Knowing that your brakes are in optimal working condition provides peace of mind. This assurance translates to a more confident and relaxed driving experience, allowing you to focus on the road ahead without concerns about brake performance.
Tips on Ensuring the Brakes Are Functioning Correctly:
-
Perform a Static Test: Before starting your vehicle, engage in a static brake test. Press the brake pedal gently while the car is stationary. Ensure that the pedal feels firm and responsive. A spongy or excessively soft pedal can be indicative of air in the brake lines or other issues.
-
Take a Short Test Drive: After performing the static test, take your Audi A3 for a short test drive within a controlled environment. Pay attention to how the brakes feel during gradual and moderate braking. They should engage smoothly and progressively without any juddering or unusual noises.
-
Test Braking at Various Speeds: During your test drive, gradually increase your speed and test the brakes at different intervals. Ensure that they respond predictably and effectively. Pay attention to any vibrations or pulling to one side, as these could indicate issues with brake calipers or alignment.
-
Listen for Unusual Noises: Keep your ears tuned for any unusual noises, such as squealing, grinding, or clicking when applying the brakes. These noises can be indicative of worn components or other problems that require attention.
-
Monitor Brake Warning Lights: After replacing the brake pads, it’s essential to reset any brake warning lights that may have been triggered during the process. Your Audi A3’s manual will provide instructions on how to do this.
-
Seek Professional Inspection: If you have any doubts about the functionality of your brakes or encounter any issues during testing, it is highly recommended to seek a professional inspection. Brakes are a critical safety component, and any uncertainties should be addressed promptly.
By taking the time to test your brakes thoroughly, you not only prioritize safety but also ensure that your Audi A3’s braking system operates optimally. This final checkpoint in the brake pad replacement process is your ultimate guarantee of a smooth and secure driving experience. With the brakes functioning correctly, you can confidently navigate the road ahead, knowing that your vehicle’s stopping power is in top-notch condition.
Wrapping Up
Wrapping up the comprehensive journey through Audi A3 brake pad replacement, we arrive at a crucial phase that often goes overlooked but holds immense significance in the realm of vehicle maintenance: record-keeping. In this final segment, we’ll underscore the importance of maintaining detailed records of your maintenance activities, whether it’s changing brake pads or any other vehicle upkeep, and emphasize the need for regular brake pad checks to prioritize safety on the road.
The Significance of Keeping Records of Maintenance:
-
Track Maintenance History: Maintaining a meticulous record of maintenance activities, including brake pad replacements, creates a comprehensive history of your Audi A3’s care. This historical data serves as a valuable reference point for future maintenance needs and troubleshooting.
-
Enhance Resale Value: When it comes time to sell or trade your vehicle, having a well-documented maintenance history can significantly enhance its resale value. Prospective buyers or dealerships are more likely to offer favorable terms for a well-maintained vehicle.
-
Warranty Compliance: If your Audi A3 is still under warranty, adhering to the manufacturer’s recommended maintenance schedule and documenting these activities is essential. It ensures that you remain compliant with warranty requirements, potentially saving you money on future repairs.
-
Identification of Patterns: Records can reveal maintenance patterns or recurring issues that might otherwise go unnoticed. For example, if you notice frequent brake pad replacements, it could indicate an underlying problem with your braking system that needs addressing.
Encouraging Regular Brake Pad Checks for Safety:
-
Prioritize Safety: The brakes are arguably the most critical safety component of your vehicle. Regular brake pad checks are vital for ensuring your safety and that of your passengers and other road users.
-
Early Detection of Issues: Routine inspections allow for early detection of brake pad wear and tear. Identifying and addressing brake pad degradation early can prevent more extensive damage to other brake system components and maintain optimal braking performance.
-
Cost Savings: Addressing brake pad issues promptly can save you money in the long run. Replacing worn brake pads is typically less expensive than repairing or replacing damaged rotors or calipers due to neglected brake maintenance.
-
Peace of Mind: Regular brake pad checks provide peace of mind. Knowing that your brakes are in good condition enhances driver confidence, reduces stress while driving, and ultimately contributes to safer road experiences.
As we conclude this comprehensive guide to Audi A3 brake pad replacement, it’s crucial to remember that vehicle maintenance is a responsibility that extends beyond the repair process itself. Keeping accurate records of your maintenance activities ensures that your vehicle continues to perform optimally and safely. Additionally, regular brake pad checks are a proactive measure to prioritize safety and maintain the integrity of your vehicle’s braking system. By adhering to these practices, you not only prolong the life of your Audi A3 but also contribute to safer roads for all.
Safety Precautions and Troubleshooting
In the realm of automotive maintenance, ensuring both the effectiveness of your brake pad replacement process and your safety on the road are paramount. Audi A3 brake pad replacement, while manageable for many car owners, requires careful attention to detail and a focus on safety throughout. In this comprehensive guide, we’ll delve into essential safety precautions to observe and provide valuable troubleshooting tips for common issues that may arise during the brake pad replacement process.
Prioritizing Safety Throughout:
-
Safety Gear: Before you even begin, ensure you have the proper safety gear on hand. Safety glasses and gloves are essential to protect your eyes and hands from potential hazards like brake dust and sharp components.
-
Vehicle Stability: Always work on a stable, level surface. Engage the parking brake and consider using wheel chocks to prevent unintended vehicle movement.
-
Jack and Jack Stands: When lifting the vehicle, utilize a hydraulic jack and sturdy jack stands rated for the vehicle’s weight. Never rely solely on the jack to support the vehicle.
-
Wheel Removal: As you embark on removing the wheel, securely place lug nuts under the vehicle to serve as a safety backup in case the jack or stands fail.
-
Caliper Hanging: When removing the caliper, avoid letting it dangle from the brake line, as this can damage the line and lead to brake failure. Use a caliper hanger or bungee cord to support the caliper’s weight.
-
Proper Torque: During reassembly, adhere to manufacturer-recommended torque specifications when tightening bolts, especially those securing the caliper. Over-tightening can cause damage, while under-tightening may lead to component failure.
Common Issues and Troubleshooting Tips:
-
Brake Noise: If you notice squealing or grinding noises after brake pad replacement, it may indicate improper installation or contamination. Double-check that the brake pads are seated correctly, and ensure there is no grease or debris on the pad surfaces.
-
Uneven Brake Wear: Uneven wear on the brake pads could be due to caliper issues, misalignment, or worn-out hardware. Inspect the caliper for proper movement and alignment, and replace any damaged hardware.
-
Soft Brake Pedal: A soft or spongy brake pedal could signal air in the brake lines. Bleeding the brakes may resolve this issue. Remember to use fresh brake fluid recommended for your Audi A3.
-
Brake Fluid Leaks: Any sign of brake fluid leaks, such as wet spots near the caliper or brake lines, should be addressed immediately. Leaks can compromise braking performance and safety.
-
Vibrations or Pulsations: If you experience vibrations or pulsations during braking, it could indicate warped rotors. Inspect and replace the rotors if necessary.
-
Warning Lights: After brake pad replacement, reset any brake warning lights that may have been triggered. Consult your vehicle’s manual or online resources for instructions specific to your Audi A3 model.
-
Test Drive: After completing the replacement process, take your vehicle for a test drive in a safe, low-traffic area. Gradually test the brakes to ensure they respond as expected before resuming regular driving.
By following these safety precautions and troubleshooting tips, you can enhance your Audi A3 brake pad replacement experience and maintain the safety and reliability of your vehicle. Remember that your safety and the safety of others on the road should always be the top priority when performing any automotive maintenance task.
Categories: Luxury Vehicles